When a ball bearing is used, it is always fitted to a shaft and/or a housing bore. Fit is a value of tightness between the shaft and bearing bore, as well as the fit between the housing and bearing outer diameter, when the bearing is installed. Fits are classified into clearance fit, intermediate fit, and interference fit.
Fits
The purpose of selecting the proper fitting condition is to suppress vibration during rotation, and to secure the inner ring and shaft of the ball bearing, and the housing and outer ring, to prevent slipping (creeping). When creeping occurs, abnormal heat generation and wear powder are generated due to sliding wear.
Abnormal heat generation accelerates the deterioration of grease, and wear particles enter the bearings, causing vibration and deterioration. It is necessary to choose a proper fit for each application because improper fits can not only degrade the bearing performance, but also they could cause seizure due to heat generation and premature failure.
In the case of interference fits, the interference causes a change in radial internal clearance. The change in radial clearance generated by interference can be calculated as shown below. (By TIMOSHENKO)
Decrease in internal clearance due to interference fit
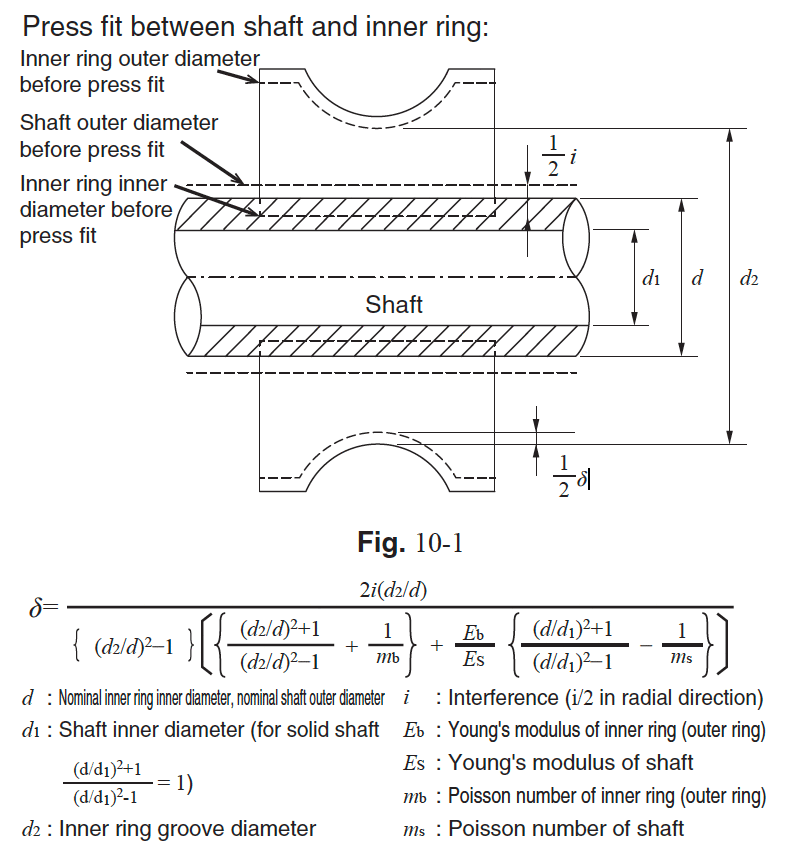
Interference fit of shaft and inner ring
The dotted line in Fig. 10-1 is the schematic before fitting, and the solid line is the schematic after fitting.
Inner ring groove diameter d2 increases by δ when press fit with interference i.
That is, δ is the amount of radial clearance reduction due to fitting.

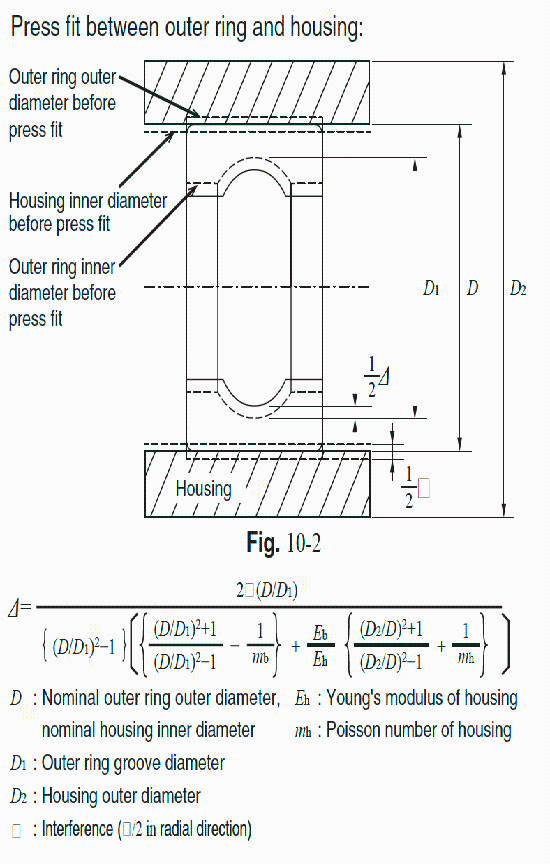
Interference fit of outer ring and housing
The dotted line in Fig. 10-2 is the schematic before fitting, and the solid line is the schematic after fitting.
When press fitted with interference I, the outer ring groove diameter D1 decreases by an amount Δ.
That is, Δ is the amount of decrease in radial clearance due to fitting.

Fixing the clearance fit with adhesive
When the bearing is fit to the shaft and housing with adhesive and without interference, it is necessary to select the proper clearance to enhance the effectiveness of the adhesive. It is recommended to consult with the adhesive manufacturer since the proper clearance depends on the type of adhesive.
Note that the roundness of the raceway ring may deteriorate due to the curing stress of the adhesive.
Precision Machined Components
Excerpt from JIS B 0401-1
Dimensional tolerance of commonly used fitting holes
unit : μm
| Dimensional division(mm) | G | H | JS | K | M | N | P | ||||||||||
|---|---|---|---|---|---|---|---|---|---|---|---|---|---|---|---|---|---|
| Over | Incl. | G7 | H5 | H6 | H7 | JS5 | JS6 | JS7 | K5 | K6 | K7 | M5 | M6 | M7 | N6 | N7 | P7 |
| - | 3 | +12 +2 |
+4 0 |
+6 0 |
+10 0 |
±2 | ±3 | ±5 | 0 -4 |
0 -6 |
0 -10 |
-2 -6 |
-2 -8 |
-2 -12 |
-4 -10 |
-4 -14 |
-6 -16 |
| 3 | 6 | +16 +4 |
+5 0 |
+8 0 |
+12 0 |
±2.5 | ±4 | ±6 | 0 -5 |
+2 -6 |
+3 -9 |
-3 -8 |
-1 -9 |
0 -12 |
-5 -13 |
-4 -16 |
-8 -20 |
| 6 | 10 | +20 +5 |
+6 0 |
+9 0 |
+15 0 |
±3 | ±4.5 | ±7.5 | +1 -5 |
+2 -7 |
+5 -10 |
-4 -10 |
-3 -12 |
0 -15 |
-7 -16 |
-4 -19 |
-9 -24 |
| 10 | 18 | +24 +6 |
+8 0 |
+11 0 |
+18 0 |
±4 | ±5.5 | ±9 | +2 -6 |
+2 -9 |
+6 -12 |
-4 -12 |
-4 -15 |
0 -18 |
-9 -20 |
-5 -23 |
-11 -29 |
| 18 | 30 | +28 +7 |
+9 0 |
+13 0 |
+21 0 |
±4.5 | ±6.5 | ±10.5 | +1 -8 |
+2 -11 |
+6 -15 |
-5 -14 |
-4 -17 |
0 -21 |
-11 -24 |
-7 -28 |
-14 -35 |
Dimensional tolerance of commonly used fitting shafts
unit : μm
| Dimension division (mm) | f | g | h | js | k | m | n | p | r | |||||||||
|---|---|---|---|---|---|---|---|---|---|---|---|---|---|---|---|---|---|---|
| Over | Incl. | f6 | g5 | g6 | h4 | h5 | h6 | js4 | js5 | js6 | k4 | k5 | k6 | m5 | m6 | n6 | p6 | r6 |
| - | 3 | -6 -12 |
-2 -6 |
-2 -8 |
0 -3 |
0 -4 |
0 -6 |
±1.5 | ±2 | ±3 | +3 0 |
+4 0 |
+6 0 |
+6 +2 |
+8 +2 |
+10 +4 |
+12 +6 |
+16 +10 |
| 3 | 6 | -10 -18 |
-4 -9 |
-4 -12 |
0 -4 |
0 -5 |
0 -8 |
±2 | ±2.5 | ±4 | +5 +1 |
+6 +1 |
+9 +1 |
+9 +4 |
+12 +4 |
+16 +8 |
+20 +12 |
+23 +15 |
| 6 | 10 | -13 -22 |
-5 -11 |
-5 -14 |
0 -4 |
0 -6 |
0 -9 |
±2 | ±3 | ±4.5 | +5 +1 |
+7 +1 |
+10 +1 |
+12 +6 |
+15 +6 |
+19 +10 |
+24 +15 |
+28 +19 |
Excerpt from JIS B 1566
Fitting of radial bearing to inner ring*1
| Bearing grade | Rotating inner ring load or indeterminate direction load | Stationary inner ring load | ||||||||
|---|---|---|---|---|---|---|---|---|---|---|
| Tolerance zone class of shaft*2 | ||||||||||
| Grade 0, 6 | r6 | p6 | n6 | m6 m5 |
k6 k5 |
js6 js5 |
h5 | h6 h5 |
g6 g5 |
f6 |
| Grade 5 | - | - | - | m5 | k4 | js4 | h4 | h5 | - | - |
| Fits | Interference fit | Intermediate fit | Clearance fit | |||||||
Fitting of radial bearing to outer ring*3
| Bearing grade | Stationary outer ring load | Indeterminate direction load or rotating outer ring load | |||||||
|---|---|---|---|---|---|---|---|---|---|
| Tolerance zone class of hole*2 | |||||||||
| Grade 0, 6 | G7 | H7 H6 |
JS7 JS6 |
- | JS7 JS6 |
K7 K6 |
M7 M6 |
N7 N6 |
P7 |
| Grade 5 | - | H5 | JS5 | K5 | - | K5 | M5 | - | - |
| Fits | Clearance fit | Intermediate fit | Interference fit | ||||||
*1 Tolerance of bearing bore is based on JIS B 1514-1
*2 Symbol of tolerance zone class is based on JIS B 0401
*3 Tolerance of bearing outer diameter is based on JIS B 1514-1.
Definitions
Rotating inner ring load : The line of action of the load is rotating in relation to the inner ring of the bearing.
Stationary inner ring load : The line of action of the load does not rotate in relation to the inner ring of the bearing.
Stationary outer ring load : The line of action of the load does not rotate in relation to the outer ring of the bearing.
Rotating outer ring load : The line of action of the load is rotating in relation to the outer ring of the bearing.
Indeterminate direction load : The direction of the load cannot be determined.
Related page
Engineering Information for Miniature & small ball bearings
Selecting the Right Part
Technical Data
Contact Us
Please click the inquiry type below according to your question. Each product / sales representative will respond to you.