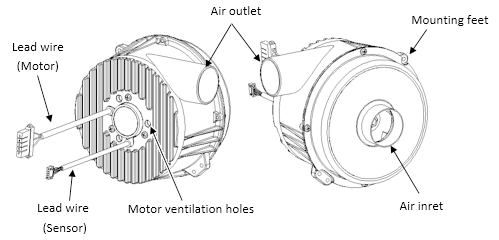
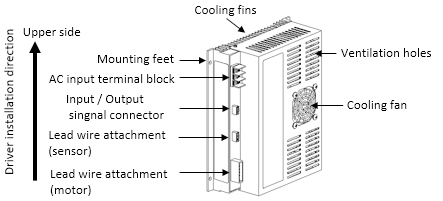
Outline of 60DCF
Part names
Blower

Driver

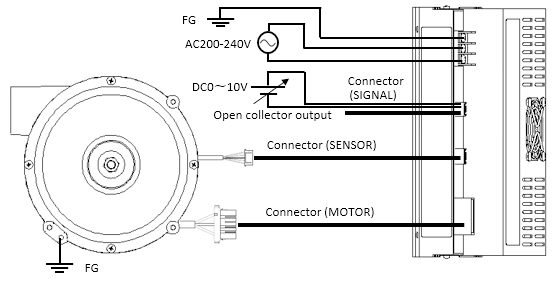
Connection Diagram

| Terminal Block | No.1 | FG | Connector(SIGNAL) | No.1 | S_CTR |
|---|---|---|---|---|---|
| No.2 | ACL | No.2 | CTR_GND | ||
| No.3 | ACN | No.3 | FOLT | ||
| No.4 | FOLT_GND | ||||
| Connector(SENSOR) | Sensor Connector Input of Blower | Connector(MOTOR) | Motor Connector Input of Blower | ||
- If terminal block is placed near the Blower, make sure vibration / air stream does not cause mechanical fatigue of wire.
Fixed attachment to a nylon clamp and/or duct is recommended. - Driver connection to an AC power supply input terminal block should be firmly fixed using a crimp-type terminal with an insulating cover. (Recommendation: RAV 1.25 - 4, JISC2805 compliance) and electric wire equivalent to or larger than 1.25 mm2.
- Make sure connector is pushed all the way down.
Rotation Speed Modulator
- The Blower output can be adjusted by adjusting The input voltage between The control I/O connector terminal S_CTR and The CTR_GND terminal.
Input voltage: 0 V DC to 10 V DC, Input current: 1 mA or less - Please input the DC voltage that meets the input voltage specification between the terminal S_CTR and the terminal CTR_GND.
AC Power Supply Voltage Range
|
Part Number |
Voltage |
Frequency |
|
|---|---|---|---|
| 60DCF-485 | AC240V | +10% | 50/60Hz |
| 60DCF-486 | -25% | ||
| 60DCF-487 | AC90V - | AC264V | |
Related page
Engineering Information for High-pressure blowers
Technical Column
Technical Data
Precautions of Use
Contact Us
Please click the inquiry type below according to your question. Each product / sales representative will respond to you.